Ramon's Blog

记录平时工作学习中的知识


  • 首页

  • 关于

  • 标签

  • 分类

  • 归档

Node底层原理简介

发表于 2019-08-22 | 更新于: 2020-01-10 | 分类于 Node.js
字数统计: 1.5k 字 | 阅读时长 ≈ 5 分钟

介绍

JavaScript我们都知道,作为前端必备的知识为大家所熟知,那Node.js大家又了解多少呢?

首先来看下Node.js官网对他的介绍

Node.js® is a JavaScript runtime built on Chrome’s V8 JavaScript engine.

直译过来就是Node.js是构建在谷歌的V8 JS引擎上运行的JavaScript。

看完并不能理解Node.js是什么,首先抛出几个问题

  1. V8引擎是什么?
  2. Node.js是什么?
  3. Node.js跟javascript有什么区别
    下面来一一解释。

V8引擎是什么

  • 是什么:随着chrome发布的JavaScript渲染引擎。
  • 做什么:对JavaScript代码进行解释执行。
  • 优势:更快。原因如下:

    相比于其他JS引擎转换为字节码或者解释执行相比,V8引擎直接将代码编译成原生机器码(IA-32、X86-64、ARM、MIPS CPUs),并且使用了如内联缓存(inline cache)等技术来提高性能。同时,V8可以独立运行或者嵌入到C++应用程序中运行(本身是由C++实现的)。

如果需要对V8引擎有更详细的了解可以查看此文章: Google V8引擎,这里就不详细解释了。

Nodejs是什么

介绍完了V8引擎,Node.js是什么呢?

Node.js就是运行在服务端的javaScript。

原因:Node.js在V8引擎的基础上进行封装扩展,使用c/c++等语言开发了大量的服务器端操作(如文件操作、网络通信、操作系统API等),用于方便搭建快速响应、易于拓展的网络应用。

基础架构

了解Node.js的原理就要从整个架构图开始,如下为Node.js的基础架构图。

Node基础架构图

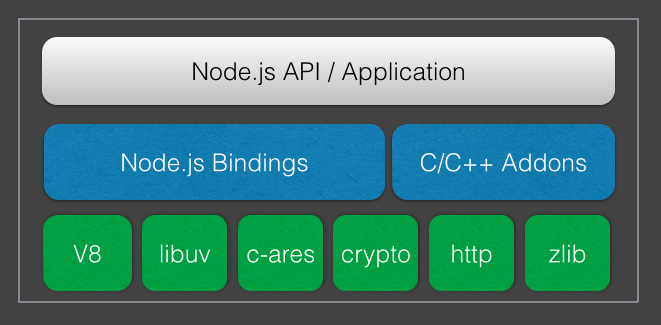
上面这个图为简单概括了下Node.js的架构,主要分为三层,下面来一一介绍:

  • Node.js/APP:这部分是所有的js代码,包括Node.js的核心代码,npm install装载的模块以及你的code等。
  • 桥接层:这一层的功能是用来将底层c/c++的代码接口提供给上层js代码使用(胶水代码)。主要有两个模块,Node.js Bindings、c/c++ Addons。其中Binding是用来桥接Node.js核心库的依赖(如zlib、OpenSSL、c-ares、http-parser 等),而Addons则是用来桥接我们自己实现的代码或者第三方库的模块。
  • Node.js的依赖库:这部分为核心依赖底层库,主要包括V8、libuv以及其他底层依赖库,我们下面来详解这些模块。

底层依赖库介绍如下:
V8前面已经说过了,高性能的JavaScript引擎,这里就不赘述了。
libuv:C语言开发,主要提供事件循环(event loop)、异步网络I/O、文件系统I/O等能力。
other:其他底层依赖库主要提供了对系统底层功能的访问,如c-ares提供DNS解析能力。crypto(OpenSSL)提供加密能力,http提供网络服务,zlib提供解压能力等等。

介绍完这些,我们好像并不能理解Node.js那些特性如单线程、异步IO,事件驱动等,下面我们通过运行原理的介绍带大家去理解这些内容。

运行原理

接到上面的介绍,首先来说单线程,我们都知道现在的程序都讲究多线程,同时处理任务,因为cpu执行速度很快,而IO相对来说要慢很多,如果是一个线程跑,其他任务等待,会导致cpu有大量的空闲时间,不仅是资源的浪费,我们的程序执行速度也会变得非常慢。那Node.js为什么还要使用单线程呢,这不是在倒退吗?
这里就引出了异步IO,Nodejs的单线程是相对而言的,我们可以理解为一个主线程,多个从线程。主线程主要执行代码逻辑,完成程序的运行,而较为缓慢的IO操作则交给从线程完成,这里的操作是异步的,也就是主线程注册了任务继续处理后面的任务,等到注册的这个任务完成后主线程才开始执行,具体结构请看下图:

Node原理图

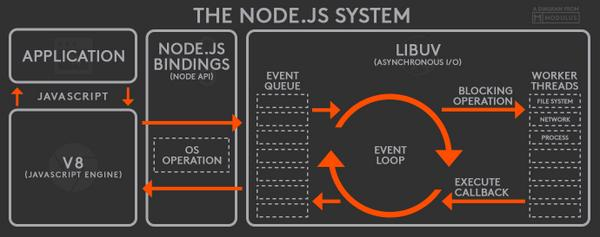
一个 Node.js 应用启动时,V8 引擎会执行你写的应用代码,保持一份观察者列表(注册在事件上的回调函数)。当事件发生时,它的回调函数会被加进一个事件队列。只要这个队列还有等待执行的回调函数,事件循环就会持续把回调函数从队列中拿出并执行。
在回调函数执行过程中,所有的 I/O 请求都会转发给工作线程处理。libuv 维持着一个线程池,包含四个工作线程(默认值,可配置)。文件系统 I/O 请求和 DNS 相关请求都会放进这个线程池处理;其他的请求,如网络、平台特性相关的请求会分发给相应的系统处理单元进行处理。
安排给线程池的这些 I/O 操作由 Node.js 的底层库执行,完成之后触发相应事件,对应的事件回调函数会被放入事件队列,等待执行后续操作。这就是一个事件在 Node.js 中执行的整个生命周期。

Node.js跟JavaScript有什么区别

最后一个问题,其实前面介绍完了,我们已经有了一个了解了,JavaScript是一门语言,而Node.js更像是是一个使用js这门异步IO的语言通过封装大量的后台库完成对高IO请求任务处理的服务端平台,一句话概括Node.js就是运行在服务端的javaScript。

引用文献

Node.js的运行原理-科普篇
Node.js原理解析
Google V8引擎

浅析指针及其应用

发表于 2019-08-22 | 更新于: 2019-08-22 | 分类于 日常
字数统计: 1k 字 | 阅读时长 ≈ 3 分钟

指针介绍

一般来说大家入门语言都是c语言,在我们学完如何将”hello world”打印在屏幕,学会了判断和循环语句,学会了一系列基础语法后,突然有一天遇到了个boss,它就是指针。

其实理解指针并不难,觉得难是因为我们学着加减乘除,突然让我们求导。不知道这么说有没有引起共鸣,理解指针需要对计算机有个了解开始。

首先,我们先要了解程序运行时的情况。当一个程序在运行时,它的数据都存放在内存中,cpu需要从内存中读取数据进行运算,然后将运算完的结果放回内存,那么如果你是cpu,你怎么知道从哪里取数据呢?我们假设存放数据的内存是一个个小盒子,数据就在这些小盒子里面,如果我们要快速准确的找到我们要的数据,按照现实中的常识我们也能猜到应该对每个小盒子进行编号,之后我们就可以根据对应编号快速找到我们想要的数据了,这个编号在程序的世界里叫做指针。

经过上面的例子,你是不是开始对指针开始有了一些理解,肯定有人说了,你说的这个我都知道,但是为什么char类型的大小是一个字节,而char*类型的指针是4个字节呢,这个就要涉及到总线的概念了。我们前面也聊过了,程序运行时需要从内存中取数据,而这个通道就是总线了。这里稍微科普下,总线分为数据总线、控制总线以及地址总线。顾名思义,跟我们指针有关的就是地址总线了,既然是线,就是一根一根的,一般来说总线都是线排,每一根线对应一个bit(0/1),那么上面说的4字节就是对应了32根线了(1个字节是8bit),也就是我们所说的32位。我们有32根线肯定要都用上啊,所以指针就有4个字节来表示。

好了,上面说了这么多,其实总结下就是一句:指针就是数据存放的地址

数组

既然介绍完了指针,我们当然要聊一下它的应用,这里就说到了数组,有些人可能觉得这跟指针有什么关系,或者另一些人觉得数组不就是指针吗?对,也不对。

首先,先解释下数组跟指针有什么关系,既然我们上面说了指针就是数据,那么数组不就是多个数据的集合吗,既然是数据的集合,当然有自己的地址了,这里要知道的是数组中数据的地址是连续的,这个是个比较重要的地方,是我们可以顺序获取数据的关键。另外说下数组并不是指针,或者准确的说数组名不是指针,可以理解为是数组的首地址,是个常数,这里一定要清楚,他是不可变的,我们可以用a[2]取得数据,也可以用(a+2)取得数据,但一定要知道的是a并不是一个指针,也就是int \ a和int a[]的区别,知道这个,数组与指针的关系也就可以分得清楚了。

链表

链表跟数组最大的区别是数组的内存是顺序的,而链表是动态的,我们通过结点中的一个next指针,指向(即存着下个结点的地址)下个结点的形式形成一串类似链表一样的数据结构。

其他

理解了链表,其实栈和队列就很好理解了,只是不同形式的链表,先进先出还是先进后出都是表现形式而已,本质都是链表。

寻找两个有序数组的中位数

发表于 2019-08-14 | 更新于: 2019-08-14 | 分类于 leetcode
字数统计: 624 字 | 阅读时长 ≈ 2 分钟

题目

给定两个大小为 m 和 n 的有序数组 nums1 和 nums2。

请你找出这两个有序数组的中位数,并且要求算法的时间复杂度为 O(log(m + n))。

你可以假设 nums1 和 nums2 不会同时为空。

示例1:

1
2
3
4
nums1 = [1, 3]
nums2 = [2]

则中位数是 2.0

示例2:

1
2
3
4
nums1 = [1, 2]
nums2 = [3, 4]

则中位数是 (2 + 3)/2 = 2.5

anwser

1
2
3
4
5
6
7
8
9
10
11
12
13
14
15
16
17
18
19
20
21
22
23
24
25
26
27
28
29
30
31
32
33
34
35
36
37
38
39
40
41
42
43
44
45
46
47
48
49
50
51
52
53
54
55
56
57
58
59
60
61
62
63
64
65
66
67
68
69
70
71
72
73
74
double findMedianSortedArrays(int* nums1, int nums1Size, int* nums2, int nums2Size){
double ret = 0; // 返回值
int x = -1; // 已去掉x下标
int y = -1; // 已去掉y下标
int m = nums1Size + nums2Size; // 还需要去掉的数
int kx = 0; // x移动后的位置
int ky = 0; // y移动后的位置
int km = 0; // 需要移动的位数
int a = 19999999;
int b = 0;

if(m != 1) {
m /= 2;
}
km = m;
while(km != 0 && x != nums1Size-1 && y != nums2Size-1) {
km = (km == 1) ? 1:(km/2);
kx = (x+km)>(nums1Size-1) ? (nums1Size-1):(x+km);
ky = (y+km)>(nums2Size-1) ? (nums2Size-1):(y+km);
if(nums1[kx] > nums2[ky]) {
m = m - ky + y;
km = m;
y = ky;
a = nums2[y];
}
else {
m = m - kx + x;
km = m;
x = kx;
a = nums1[x];
}
}
if(x != nums1Size-1) {
kx = (x+1+m)>(nums1Size-1) ? (nums1Size-1):(x+1+m);
}
if(y != nums2Size-1) {
ky = (y+1+m)>(nums2Size-1) ? (nums2Size-1):(y+1+m);
}
b = (nums1Size + nums2Size) % 2;

if(x == nums1Size-1) {
//x已经走到头了,只有y了
if(b) {
ret = nums2[ky];
}
else {
if (a == 19999999 || m > 0) {
a = nums2[ky-1];
}
ret = (double)(nums2[ky]+a)/2;
}
}
else if(y == nums2Size-1) {
if(b) {
ret = nums1[kx];
}
else {
if (a == 19999999 || m > 0) {
a = nums1[kx-1];
}
ret = (double)(nums1[kx]+a)/2;
}
}
else {
// 两者都有
ret = nums1[kx] > nums2[ky] ? nums2[ky] : nums1[kx];
// 为偶数时,取x/y中较大的和kx/ky中较小的相加/2
if(b == 0){
ret = (double)(ret+a)/2;
}
}

return ret;
}

没有力气解读了,到现在最难的一个算法了,处理各种边界问题到心态爆炸,而且还是在没有解决所以去参考了解法自己实现的情况下,具体解法采用的是最小k值法,详细算法请参考下列链接,我就不赘述了:median-of-two-sorted-arrays

总结

即使知道了这么巧妙的解法,实现起来也花了好久好久,错了很多遍,不过自己最终挺了过来,坚持完成了,超过了88%的c语言提交者,虽然是因为算法优秀,但是毕竟是自己实现的,也希望自己后面遇到困难坚持下去,不放弃,总会成功的。

longest-substring-without-repeating-characters

发表于 2019-08-09 | 更新于: 2019-08-09 | 分类于 leetcode
字数统计: 1.3k 字 | 阅读时长 ≈ 5 分钟

Title

Given a string, find the length of the longest substring without repeating characters.

Example 1:

1
2
3
Input: "abcabcbb"
Output: 3
Explanation: The answer is "abc", with the length of 3.

Example 2:

1
2
3
Input: "bbbbb"
Output: 1
Explanation: The answer is "b", with the length of 1.

Example 3:

1
2
3
4
Input: "pwwkew"
Output: 3
Explanation: The answer is "wke", with the length of 3.
Note that the answer must be a substring, "pwke" is a subsequence and not a substring.

my anwser

1
2
3
4
5
6
7
8
9
10
11
12
13
14
15
16
17
18
19
20
21
22
23
24
25
26
class Solution {
public:
int lengthOfLongestSubstring(string s) {
set<char> s_str;
int i = 0;
int j = 0;
int len = s.length();
int ret = 0;
for(i = 0; i < len; i++) {
s_str.insert(s[i]);
for(j = 1; j < len - i; j++) {
if(s_str.count(s[i+j]) == 0) {
s_str.insert(s[i+j]);
}
else {
s_str.clear();
break;
}
}
if(ret < j) {
ret = j;
}
}
return ret;
}
};

实打实的暴力破解法,这次没用c语言是因为考虑到查看新增的字符是不是出现在前面,又要再加个循环,跑到O(n^3),实在是花费太多时间了,那就用set代替,虽然知道这样做在set内部也要用插入删除的操作,但总归是比for看起来舒服很多的,结果也是相当的不理想,不过因为自己这次在优化过程中一直想着是不是能用动态规划而把自己限制死了,私下在研究下动态规划吧🌚。
不过,在看了标准答案后真的是豁然开朗,原来是这么做的,其实自己如果一步步优化很多东西完全是可以想到的,以后要注意尽量不要眼高手低,下面先来欣赏标准答案第一个精彩的解法(直接忽略掉暴力解法):

解法一

1
2
3
4
5
6
7
8
9
10
11
12
13
14
15
16
17
18
public class Solution {
public int lengthOfLongestSubstring(String s) {
int n = s.length();
Set<Character> set = new HashSet<>();
int ans = 0, i = 0, j = 0;
while (i < n && j < n) {
// try to extend the range [i, j]
if (!set.contains(s.charAt(j))){
set.add(s.charAt(j++));
ans = Math.max(ans, j - i);
}
else {
set.remove(s.charAt(i++));
}
}
return ans;
}
}

精彩的滑动窗口解法,一次遍历字符串,遇到重复的就移动左边届,直到没有重复内容,其实就是在暴力破解的基础上做了一些巧妙的改动,这个代码比较简单,比较好理解,重点放在后面两个优化后的算法上。

解法二

1
2
3
4
5
6
7
8
9
10
11
12
13
14
15
public class Solution {
public int lengthOfLongestSubstring(String s) {
int n = s.length(), ans = 0;
Map<Character, Integer> map = new HashMap<>(); // current index of character
// try to extend the range [i, j]
for (int j = 0, i = 0; j < n; j++) {
if (map.containsKey(s.charAt(j))) {
i = Math.max(map.get(s.charAt(j)), i);
}
ans = Math.max(ans, j - i + 1);
map.put(s.charAt(j), j + 1);
}
return ans;
}
}

非常精彩的解法,让我想到了kmp算法,这里的map就相当于next数组,在之前滑动窗口的基础上进行了改进,之前左边界需要逐步移动,这里通过map获取到当前字符对应的value值直接得到下一步左边届的位置,与next数组有异曲同工之妙,下次我也找个时间细细研究下kmp算法,更新一篇关于kmp算法的文章,这里就不多说了,先介绍上面的算法。

从上面聊下来,其实这里最难理解的就是i作为左边届(上面i是当前匹配字符串的左边界,j是右边界),是怎么快速得到的。

首先,map在这里用的非常巧妙,map对应的值始终是下一跳的位置,我们以abcaa为例,看map中k以及v及i的变化:

j 0 1 2 3 4
k a b c a a
v 1 2 3 4 5
i 0 0 0 1 4

从表中可以看出,当遇到相同的k时,递增的v就会改变对应的值为下次下标所在的位置,i此时获得的时之前value的值,也就是对应的左边届的位置是根据上次字符出现时的next位置决定的,因为在这之间的字符我们已经可以判断没有在轮询的必要了(每次都跳到上次出现的后一个位置)。

下面是针对上面这种解法的又一次优化:

解法三

1
2
3
4
5
6
7
8
9
10
11
12
13
public class Solution {
public int lengthOfLongestSubstring(String s) {
int n = s.length(), ans = 0;
int[] index = new int[128]; // current index of character
// try to extend the range [i, j]
for (int j = 0, i = 0; j < n; j++) {
i = Math.max(index[s.charAt(j)], i);
ans = Math.max(ans, j - i + 1);
index[s.charAt(j)] = j + 1;
}
return ans;
}
}

这里针对ascii码是有限的(而且边界比较小),用数组替换了map,完成了这个精彩的算法,上面我们说的挺多的了,这里就不重复说了。

总结

这次完全是自己眼高手低了,算法应该先用自己能想到的方法实现,然后针对该算饭进行一步步优化,而不是刚开始就想着一口吃个胖子,有个多优秀的算法解决。同时,动态规划也要好好学习,首先,最起码应该知道什么情况下使用动态规划。

TWO NUM

发表于 2019-08-09 | 更新于: 2019-08-09 | 分类于 leetcode
字数统计: 635 字 | 阅读时长 ≈ 3 分钟

Title

Given an array of integers, return indices of the two numbers such that they add up to a specific target.

You may assume that each input would have exactly one solution, and you may not use the same element twice.

Example:

1
2
3
Given nums = [2, 7, 11, 15], target = 9,
Because nums[0] + nums[1] = 2 + 7 = 9,
return [0, 1].

anwser

1
2
3
4
5
6
7
8
9
10
11
12
13
14
15
16
17
18
19
20
21
22
23
24
25
26
27
28
29
30
/**
* Note: The returned array must be malloced, assume caller calls free().
*/
int* twoSum(int* nums, int numsSize, int target, int* returnSize){
int *ret = NULL;
int row = 0;
int col = 0;
int add = 0;

ret = (int *)malloc(sizeof(int)*2);
ret[0] = 0;
ret[1] = 0;
*returnSize = 0;
for(;row < numsSize-1; row++)
{
for(col = row+1; col < numsSize; col++)
{
add = nums[row] + nums[col];
if(add == target)
{
ret[0] = row;
ret[1] = col;
*returnSize = 2;
break;
}
}
}

return ret;
}

显而易见,最low的解法,因为是刚开始做,尝试进行优化无果后去查看官方的解法,恍然大悟,原来可以用hashmap等容器进行辅助,将时间复杂度由O(n^2)降低到O(n),先来看代码:

1
2
3
4
5
6
7
8
9
10
11
12
13
public int[] twoSum(int[] nums, int target) {
Map<Integer, Integer> map = new HashMap<>();
for (int i = 0; i < nums.length; i++) {
map.put(nums[i], i);
}
for (int i = 0; i < nums.length; i++) {
int complement = target - nums[i];
if (map.containsKey(complement) && map.get(complement) != i) {
return new int[] { i, map.get(complement) };
}
}
throw new IllegalArgumentException("No two sum solution");
}

上述代码是用java写的,主要是通过遍历一遍数组,得到一个map,然后从里面找到target与num[i]的差值,这里简单的应用了hashmap就完成了复杂的操作,也是我们需要灵活运用数据结构的例子。

这里虽然上面已经做到很快,但是在进行之前还是需要先轮训一遍数组,我们是不是可以省去这一步呢,这时候有了第三种方法,同样的,我们先来看代码:

1
2
3
4
5
6
7
8
9
10
11
public int[] twoSum(int[] nums, int target) {
Map<Integer, Integer> map = new HashMap<>();
for (int i = 0; i < nums.length; i++) {
int complement = target - nums[i];
if (map.containsKey(complement)) {
return new int[] { map.get(complement), i };
}
map.put(nums[i], i);
}
throw new IllegalArgumentException("No two sum solution");
}

通过上述代码我们可以看到巧妙的地方,只是走了一遍轮训,在这个过程中找到hashmap中是否由差值,如果没有就存进去

总结

这道题很简单,但是让我看到了hashmap在某些算法场景下能带来的巨大改进,同时也看到了巧妙的运用代码可以更高效的完成我们的操作,以后写算法看来不能全都用c语言了,毕竟容器的实现并不是我们刷题的重点。

pssh/pscp

发表于 2019-08-09 | 更新于: 2019-08-09 | 分类于 小技巧
字数统计: 571 字 | 阅读时长 ≈ 2 分钟

介绍

学习到这个批量处理工具是在工作中有一次写了个对现网环境中脏链接/进程/文件等脏数据进行检测分析的脚本,但是需要将这个脚本放到对应宿主机中,于是了解到了这两个批量处理的脚本,下面我们来介绍下脚本的使用。

pscp

scp是我们经常会用到的命令,是secure copy的简写,用于在Linux下进行远程拷贝文件的命令,如下为说明文档:

1
2
3
4
5
6
7
8
9
10
11
12
13
14
15
16
17
18
19
20
21
22
23
24
25
26
27
28
29
Usage: pscp [OPTIONS] local remote

Options:
--version show program's version number and exit
--help show this help message and exit
-h HOST_FILE, --hosts=HOST_FILE
hosts file (each line "[user@]host[:port]")
-H HOST_STRING, --host=HOST_STRING
additional host entries ("[user@]host[:port]")
-l USER, --user=USER username (OPTIONAL)
-p PAR, --par=PAR max number of parallel threads (OPTIONAL)
-o OUTDIR, --outdir=OUTDIR
output directory for stdout files (OPTIONAL)
-e ERRDIR, --errdir=ERRDIR
output directory for stderr files (OPTIONAL)
-t TIMEOUT, --timeout=TIMEOUT
timeout (secs) (0 = no timeout) per host (OPTIONAL)
-O OPTION, --option=OPTION
SSH option (OPTIONAL)
-v, --verbose turn on warning and diagnostic messages (OPTIONAL)
-A, --askpass Ask for a password (OPTIONAL)
-x ARGS, --extra-args=ARGS
Extra command-line arguments, with processing for
spaces, quotes, and backslashes
-X ARG, --extra-arg=ARG
Extra command-line argument
-r, --recursive recusively copy directories (OPTIONAL)

Example: pscp -h hosts.txt -l irb2 foo.txt /home/irb2/foo.txt

当我们需要批量传输文件时可以使用如下命令

1
pscp -h $ip_file -lroot $file $dest_path

这里的ipfile的文件中可以放置我们的ips

pssh

同pscp一样,pssh为ssh的批处理版,说明文档如下:

1
2
3
4
5
6
7
8
9
10
11
12
13
14
15
16
17
18
19
20
21
22
23
24
25
26
27
28
29
30
31
32
Usage: pssh [OPTIONS] command [...]

Options:
--version show program's version number and exit
--help show this help message and exit
-h HOST_FILE, --hosts=HOST_FILE
hosts file (each line "[user@]host[:port]")
-H HOST_STRING, --host=HOST_STRING
additional host entries ("[user@]host[:port]")
-l USER, --user=USER username (OPTIONAL)
-p PAR, --par=PAR max number of parallel threads (OPTIONAL)
-o OUTDIR, --outdir=OUTDIR
output directory for stdout files (OPTIONAL)
-e ERRDIR, --errdir=ERRDIR
output directory for stderr files (OPTIONAL)
-t TIMEOUT, --timeout=TIMEOUT
timeout (secs) (0 = no timeout) per host (OPTIONAL)
-O OPTION, --option=OPTION
SSH option (OPTIONAL)
-v, --verbose turn on warning and diagnostic messages (OPTIONAL)
-A, --askpass Ask for a password (OPTIONAL)
-x ARGS, --extra-args=ARGS
Extra command-line arguments, with processing for
spaces, quotes, and backslashes
-X ARG, --extra-arg=ARG
Extra command-line argument
-i, --inline inline aggregated output and error for each server
--inline-stdout inline standard output for each server
-I, --send-input read from standard input and send as input to ssh
-P, --print print output as we get it

Example: pssh -h hosts.txt -l irb2 -o /tmp/foo uptime

这里我们更常用来对集群进行批处理,执行命令或者文件

pstree/pstack/strace

发表于 2019-08-09 | 更新于: 2019-08-09 | 分类于 小技巧
字数统计: 1k 字 | 阅读时长 ≈ 5 分钟

介绍

今天介绍的几个命令主要是追踪进程执行状态用的,在平时工作中经常遇到进程卡住的情况,导致后续任务失败,如果当前现场得以保留,我们可以用这三个命令来完成对问题根因的查找以及处理。

pstree

pstree命令主要以树状图的形式展现进程间的调用关系,通过ps获取到进程的进程id后传入pstree进行进程查看,官方介绍如下:

pstree shows running processes as a tree. The tree is rooted at either pid or init if pid is omitted.
If a user name is specified, all process trees rooted at processes owned by that user are shown.

以下为各选项的说明文档:

1
2
3
4
5
6
7
8
9
10
11
12
13
14
15
16
17
18
19
20
21
pstree: invalid option -- '-'
Usage: pstree [ -a ] [ -c ] [ -h | -H PID ] [ -l ] [ -n ] [ -p ] [ -u ]
[ -A | -G | -U ] [ PID | USER ]
pstree -V
Display a tree of processes.

-a show command line arguments
-A use ASCII line drawing characters
-c don't compact identical subtrees
-h highlight current process and its ancestors
-H PID highlight this process and its ancestors
-G use VT100 line drawing characters
-l don't truncate long lines
-n sort output by PID
-p show PIDs; implies -c
-u show uid transitions
-U use UTF-8 (Unicode) line drawing characters
-V display version information
-Z show SELinux security contexts
PID start at this PID; default is 1 (init)
USER show only trees rooted at processes of this user

pstack

pstack跟pstree不太一样,pstree主要看进程间的调用关系,pstack主要是查看进程函数堆栈,核心实现是使用了gdb以及threadapply all bt 命令

一般用法为直接加pid,如下

pstack

命令结果如下:

1
2
3
4
5
6
7
8
9
10
11
12
13
14
15
16
17
18
19
20
21
22
23
24
25
26
pstack 4551
Thread 7 (Thread 1084229984 (LWP 4552)):
#0 0x000000302afc63dc in epoll_wait () from /lib64/tls/libc.so.6
#1 0x00000000006f0730 in ub::EPollEx::poll ()
#2 0x00000000006f172a in ub::NetReactor::callback ()
#3 0x00000000006fbbbb in ub::UBTask::CALLBACK ()
#4 0x000000302b80610a in start_thread () from /lib64/tls/libpthread.so.0
#5 0x000000302afc6003 in clone () from /lib64/tls/libc.so.6
#6 0x0000000000000000 in ?? ()
Thread 6 (Thread 1094719840 (LWP 4553)):
#0 0x000000302afc63dc in epoll_wait () from /lib64/tls/libc.so.6
#1 0x00000000006f0730 in ub::EPollEx::poll ()
#2 0x00000000006f172a in ub::NetReactor::callback ()
#3 0x00000000006fbbbb in ub::UBTask::CALLBACK ()
#4 0x000000302b80610a in start_thread () from /lib64/tls/libpthread.so.0
#5 0x000000302afc6003 in clone () from /lib64/tls/libc.so.6
#6 0x0000000000000000 in ?? ()
Thread 5 (Thread 1105209696 (LWP 4554)):
#0 0x000000302b80baa5 in __nanosleep_nocancel ()
#1 0x000000000079e758 in comcm::ms_sleep ()
#2 0x00000000006c8581 in ub::UbClientManager::healthyCheck ()
#3 0x00000000006c8471 in ub::UbClientManager::start_healthy_check ()
#4 0x000000302b80610a in start_thread () from /lib64/tls/libpthread.so.0
#5 0x000000302afc6003 in clone () from /lib64/tls/libc.so.6
#6 0x0000000000000000 in ?? ()
....

strace

strace常用来跟踪进程执行时的系统调用和所接收的信号。 在Linux世界,进程不能直接访问硬件设备,当进程需要访问硬件设备(比如读取磁盘文件,接收网络数据等等)时,必须由用户态模式切换至内核态模式,通 过系统调用访问硬件设备。strace可以跟踪到一个进程产生的系统调用,包括参数,返回值,执行消耗的时间

如下为strace的参数定义

1
2
3
4
5
6
7
8
9
10
11
12
13
14
15
16
17
18
19
20
21
22
23
24
25
26
27
strace: invalid option -- '-'
usage: strace [-dDffhiqrtttTvVxx] [-a column] [-e expr] ... [-o file]
[-p pid] ... [-s strsize] [-u username] [-E var=val] ...
[command [arg ...]]
or: strace -c [-D] [-e expr] ... [-O overhead] [-S sortby] [-E var=val] ...
[command [arg ...]]
-c -- count time, calls, and errors for each syscall and report summary
-f -- follow forks, -ff -- with output into separate files
-F -- attempt to follow vforks, -h -- print help message
-i -- print instruction pointer at time of syscall
-q -- suppress messages about attaching, detaching, etc.
-r -- print relative timestamp, -t -- absolute timestamp, -tt -- with usecs
-T -- print time spent in each syscall, -V -- print version
-v -- verbose mode: print unabbreviated argv, stat, termio[s], etc. args
-x -- print non-ascii strings in hex, -xx -- print all strings in hex
-a column -- alignment COLUMN for printing syscall results (default 40)
-e expr -- a qualifying expression: option=[!]all or option=[!]val1[,val2]...
options: trace, abbrev, verbose, raw, signal, read, or write
-o file -- send trace output to FILE instead of stderr
-O overhead -- set overhead for tracing syscalls to OVERHEAD usecs
-p pid -- trace process with process id PID, may be repeated
-D -- run tracer process as a detached grandchild, not as parent
-s strsize -- limit length of print strings to STRSIZE chars (default 32)
-S sortby -- sort syscall counts by: time, calls, name, nothing (default time)
-u username -- run command as username handling setuid and/or setgid
-E var=val -- put var=val in the environment for command
-E var -- remove var from the environment for command

已经有很多文章对这个进行了详细的介绍,这里就不重复造轮子了,具体了解可以看如下链接:

https://man.linuxde.net/strace

总结

今天了解到的命令都是进程追踪的命令,当我们遇到进程出现问题需要追踪调试的时候可以使用。

getopts

发表于 2019-08-09 | 更新于: 2019-08-09 | 分类于 小技巧
字数统计: 531 字 | 阅读时长 ≈ 2 分钟

介绍

平时使用命令的时候,我们经常会使用–help查看选项列表进行使用,那么在命令内部是怎么获取到我们的选项以及参数使用的呢?

今天就来介绍下这个命令

,在shell脚本中可以读取到命令行输入的选项及参数。
1
2
3
4
5
6
7
8
9
10
11
12
13
14
15
16
17
18
19
20
21
22
23
24

### 用法

首先我们先来看个简单的小例子

```sh
➜ /Users/ramon.zhang/project/shell/test > sh getopts.sh -a hello
getopts test
the -a option is: hello
➜ /Users/ramon.zhang/project/shell/test > cat getopts.sh
#!/bin/bash

echo "getopts test"
while getopts a: option
do
case $option
in
a)
echo "the -a option is: $OPTARG"
;;
\?)
;;
esac
done

从上面我们可以看到,通过使用getopts,我们可以读取到-a以及其参数。一切都很顺利,那么第一个疑问点来了,getopts后面的option_string是

1
2
3
4
5
6
7
8
9
10
11
12
13
14
15
16
17
18
19
```sh
➜ /Users/ramon.zhang/project/shell/test > sh getopts.sh -a hello
getopts test
the -a option is:
➜ /Users/ramon.zhang/project/shell/test > cat getopts.sh
#!/bin/bash

echo "getopts test"
while getopts a option
do
case $option
in
a)
echo "the -a option is: $OPTARG"
;;
\?)
;;
esac
done

去掉

1
2
3
4
5
6
7
8
9
10
11
12
13
14
15
16
17
18
19
20
21

那另外一点,如果有```:```的情况下,不传入参数,会发生什么,这里同样看例子:
```sh
➜ /Users/ramon.zhang/project/shell/test > sh getopts.sh -a
getopts test
getopts.sh: option requires an argument -- a
➜ /Users/ramon.zhang/project/shell/test > cat getopts.sh
#!/bin/bash

echo "getopts test"
while getopts a: option
do
case $option
in
a)
echo "the -a option is: $OPTARG"
;;
\?)
;;
esac
done

很明显的报错了,不过需求是多样的,可能有些时候我们确实不用传参数,这时候我们就可以在

1
2
3
4
5
6
7
8
9
10
11
12
13
14
15
16
17
18
19
20
21
22
23
24
25
26
27
28
29
30
31
32
```sh
➜ /Users/ramon.zhang/project/shell/test > sh getopts.sh -a hello -b hey -c world -d
getopts test
the -a option is: hello
the -b option is: hey
the -c option is: world
the -d option is:
➜ /Users/ramon.zhang/project/shell/test > cat getopts.sh
#!/bin/bash

echo "getopts test"

while getopts :a::b:c:d option
do
case $option
in
a)
echo "the -a option is: $OPTARG"
;;
b)
echo "the -b option is: $OPTARG"
;;
c)
echo "the -c option is: $OPTARG"
;;
d)
echo "the -d option is: $OPTARG"
;;
\?)
;;
esac
done

上面就是getopts的基础用法了,还有一个相似的但是比较老的命令getopt,他支持长选项,有兴趣的可以去了解,这里就不介绍了。

参考文章

shell getopts用法

ADD TWO NUM

发表于 2019-08-09 | 更新于: 2019-08-09 | 分类于 leetcode
字数统计: 767 字 | 阅读时长 ≈ 3 分钟

Title

You are given two non-empty linked lists representing two non-negative integers. The digits are stored in reverse order and each of their nodes contain a single digit. Add the two numbers and return it as a linked list.

You may assume the two numbers do not contain any leading zero, except the number 0 itself.

Example:

1
2
3
Input: (2 -> 4 -> 3) + (5 -> 6 -> 4)
Output: 7 -> 0 -> 8
Explanation: 342 + 465 = 807.

anwser

1
2
3
4
5
6
7
8
9
10
11
12
13
14
15
16
17
18
19
20
21
22
23
24
25
26
27
28
29
30
31
32
33
34
35
36
37
38
39
40
41
42
43
/**
* Definition for singly-linked list.
* struct ListNode {
* int val;
* struct ListNode *next;
* };
*/
struct ListNode* addTwoNumbers(struct ListNode* l1, struct ListNode* l2) {
int up = 0;
struct ListNode* list1 = l1;
struct ListNode* list2 = l2;
struct ListNode* tmp = NULL;
struct ListNode* ret = NULL;

while (!(list1 == NULL && list2 == NULL && up == 0)) {
if(tmp != NULL) {
tmp->next = (struct ListNode*)malloc(sizeof(struct ListNode));
tmp = tmp->next;
}
else {
tmp = (struct ListNode*)malloc(sizeof(struct ListNode));
ret = tmp;
}
tmp->val = up;
tmp->next = NULL;
if (list1 != NULL) {
tmp->val += list1->val;
list1 = list1->next;
}
if (list2 != NULL) {
tmp->val += list2->val;
list2 = list2->next;
}
if (tmp->val > 9) {
tmp->val = tmp->val%10;
up = 1;
}
else {
up = 0;
}
}
return ret;
}

这次的解题要比上次好了很多,不过前期也错误了几次,因为错误代码没有保留(大家应该也没兴趣)这里就不展示了,下面是这次提交后的成果:

Runtime: 12 ms, faster than 87.29% of C online submissions for Add Two Numbers.
Memory Usage: 8.8 MB, less than 89.63% of C online submissions for Add Two Numbers.

哈哈,小小的开心下,来说下思路,本来一开始想着去直接返回l1或者l2,不增添新的空间,但是发现这样做迈不过要检查这两个链表长度的坎,如果要查长度,每个链表轮训一次的话,花费的时间就太长了,于是new了一个新的tmp链表,考虑到要返回这个链表,所以需要把头指针保存下来,所以就在循环的一开始有个判断,找到第一次,既解决了malloc返回对象第一次能正确送达到tmp链表的问题,也解决了ret获取到头节点指针的麻烦。

另外一个麻烦的地方是进位,如果最后一位有进位按照一般逻辑来说要拿出来判断,然后malloc,既然前面省了这么多,怎么能在这一步失败,所以苦思冥想,通过修改循环内部结构和while的条件解决了多一个进位的情况,同时整理代码看起来也简洁了很多。

最后放出标准答案:

1
2
3
4
5
6
7
8
9
10
11
12
13
14
15
16
17
18
19
public ListNode addTwoNumbers(ListNode l1, ListNode l2) {
ListNode dummyHead = new ListNode(0);
ListNode p = l1, q = l2, curr = dummyHead;
int carry = 0;
while (p != null || q != null) {
int x = (p != null) ? p.val : 0;
int y = (q != null) ? q.val : 0;
int sum = carry + x + y;
carry = sum / 10;
curr.next = new ListNode(sum % 10);
curr = curr.next;
if (p != null) p = p.next;
if (q != null) q = q.next;
}
if (carry > 0) {
curr.next = new ListNode(carry);
}
return dummyHead.next;
}

总结

这道题也是一道简单的算法题,但是有了上一道题的经验,这里对他进行了多次优化,用尽量少的代码和尽量省时间的方式来完成算法,通过结果也是对自己算法之路的一点鼓励了。

coc.nvim介绍

发表于 2019-08-09 | 更新于: 2019-08-09 | 分类于 日常
字数统计: 1.4k 字 | 阅读时长 ≈ 6 分钟

介绍

官方介绍: oc.nvim 为您提供全方位的 LSP 特性支持,包含智能补全、错误提示、参数提示等功能,关于 LSP 的详细特性请查看官方文档。


我的理解: coc.nvim是一个基于nodejs开发的插件平台,利用了node异步的特性快速实现各种辅助功能,相比YCM的体积大,需要编译,且巨多安装过程中的坑来说,coc可配置性高、速度快、体积小,用起来非常舒服。

安装

推荐使用 https://github.com/junegunn/vim-plug 添加

Plug ‘neoclide/coc.nvim’, {‘branch’: ‘release’}

到 init.vim 然后执行:

:PlugInstall

如果使用其它插件进行配置,请使用 release 分支代码。

配置

可通过 coc-settings.json 文件进行配置,该文件为 jconc 格式,就是添加了注释格式支持的 json。

使用命令 |:CocConfig| 打开用户配置文件,或者在项目根目录下创建.vim/coc-settings.json 文件,后者优先级更高。
执行命令 :CocInstall coc-json 安装 json 语言支持,该插件可提供配置补全和验证等功能。

下列为我的配置文件,仅供参考:

1
2
3
4
5
6
7
8
9
10
11
12
13
14
15
16
17
18
19
20
21
22
23
24
25
26
27
28
29
30
31
32
33
34
35
36
37
38
39
40
41
42
43
44
45
46
47
48
49
50
51
52
53
54
55
56
57
58
59
60
61
62
63
64
65
66
67
68
69
70
71
72
73
74
75
76
77
78
79
80
81
82
83
84
85
86
87
88
89
90
91
92
93
94
95
96
97
98
99
100
101
102
103
104
105
106
107
108
109
110
111
112
113
114
115
116
117
118
119
120
121
122
123
124
125
126
127
{
"suggest.snippetIndicator": "",
"suggest.enablePreview":true,
"initializationOptions": {
"cache": {
"directory": "/tmp/ccls"
},
"clang": {
"resourceDir": "/Library/Developer/CommandLineTools/usr/lib/clang/10.0.1",
"extraArgs": [
"-isystem",
"/Applications/Xcode.app/Contents/Developer/Toolchains/XcodeDefault.xctoolchain/usr/include/c++/V1",
"-I",
"/Applications/Xcode.app/Contents/Developer/Platforms/MacOSX.platform/Developer/SDKs/MacOSX.sdk/usr/include/"
]
}
},
"tsserver.enableJavascript": true,
"languageserver": {
"efm": {
"command": "efm-langserver",
"args": [],
"filetypes": ["vim", "eruby", "markdown"]
},
"flow": {
"command": "flow",
"args": ["lsp"],
"filetypes": ["javascript", "javascriptreact"],
"initializationOptions": {},
"requireRootPattern": true,
"settings": {},
"rootPatterns": [".flowconfig"]
},
"golang": {
"command": "gopls",
"args": [],
"rootPatterns": ["go.mod", ".vim/", ".git/", ".hg/"],
"filetypes": ["go"]
},
"clangd": {
"command": "clangd",
"args": ["--background-index"],
"rootPatterns": ["compile_flags.txt", "compile_commands.json", ".vim/", ".git/", ".hg/"],
"filetypes": ["c", "cc", "cpp", "objc", "objcpp"]
},
"foo": {
"module": "/usr/local/lib/node_modules/foo/index.js",
"args": ["--node-ipc"],
"filetypes": ["foo"],
"trace.server": "verbose",
"rootPatterns": ["root.yml"],
"execArgv": ["--nolazy", "--inspect-brk=6045"],
"initializationOptions": {
},
"settings": {
"validate": true
}
},
"python": {
"command": "python",
"args": [
"-mpyls",
"-vv",
"--log-file",
"/tmp/lsp_python.log"
],
"trace.server": "verbose",
"filetypes": [
"python"
],
"settings": {
"pyls": {
"enable": true,
"trace": {
"server": "verbose"
},
"commandPath": "",
"configurationSources": [
"pycodestyle"
],
"plugins": {
"jedi_completion": {
"enabled": true
},
"jedi_hover": {
"enabled": true
},
"jedi_references": {
"enabled": true
},
"jedi_signature_help": {
"enabled": true
},
"jedi_symbols": {
"enabled": true,
"all_scopes": true
},
"mccabe": {
"enabled": true,
"threshold": 15
},
"preload": {
"enabled": true
},
"pycodestyle": {
"enabled": true
},
"pydocstyle": {
"enabled": false,
"match": "(?!test_).*\\.py",
"matchDir": "[^\\.].*"
},
"pyflakes": {
"enabled": true
},
"rope_completion": {
"enabled": true
},
"yapf": {
"enabled": true
}
}
}
}
}
}
}

补全功能

因为我现在只用到了智能补全的功能,下面就先来介绍一下 coc 里面的补全功能。

这里摘抄整理自开发者的介绍,原文链接coc.nvim介绍

  • 多种触发方式,同时支持手工触发。默认使用 always 自动模式表示输入单词首字母以及 trigger character 时触发补全,可配置为 trigger 模式,表示仅在输入 trigger character 时触发,或者配置为 none,表示禁用自动触发。任何触发模式下都可使用绑定的快捷键进行手工触发。
    模糊匹配,智能大小写。同 YCM 等知名插件。
  • 多 source 异步并发获取。同时异步获取不同 source 结果,效率更高。
    支持用户自定义 source。可通过编写 viml 插件实现自定义 source, 自定义补全 source 文档
    Source 管理功能。 使用命令 :Denite source 查看当前 buffer 使用 source 列表,默认回车操作切换 source 可用状态。
  • 支持通过删除字符纠正错误输入。 为了提高过滤的效率,除非清空当前过滤字符,否则删除过多的字符不会导致补全停止,而是触发一次针对已有补全缓存的重新过滤。
  • 尊重用户 completeopt 配置。 coc 会在补全开始后将 completeopt 设置为 menuone,noselect,noinsert 补全完成后重置初始设置,原因是使用 vim 自带的补全时,很多用户更青睐使用 menu,preview 来做为 completeopt (因为 vim 本身的补全过滤并不支持模糊匹配)。
  • 支持 language server 返回的 triggerCharacters 作为触发字符。
  • 支持 completion resolve 请求。用户选中 complete item 后向 server 请求详细数据,通常用做请求文档以及 textEdit 等字段。
  • 支持 LSP 补全项中的 sortText,filterText 以及 insertText 字段
  • 支持 LSP 补全项完成后续操作,包含 textEdit,additinalTextEdit 以及 command。
  • 支持 snippet 类型补全。coc 实现了 LSP 中定义的 snippet (包含 choice 功能),无需额外安装插件,且在确认补全时自动触发。

总结

coc.nvim的生态很快的建立起来,使用感受也很不错,而且可定制性很强,vim用户的福音,如果你正在苦于YCM的安装编译问题处理,可以试试这款插件,另外其他支持都可以在github上面找到。

12

Ramon

当你觉得晚的时候,恰恰是最早的时候

20 日志
8 分类
8 标签
© 2020 Ramon
由 Hexo 强力驱动
|
主题 — NexT.Gemini v5.1.4
访问人数 总访问量 次